How to Check for Broken Links in Webflow
· Updated
To fix broken links in Webflow, repair the source link in the Designer or CMS and add a 301 redirect when a published URL has a relevant replacement. Redirects are managed in Site settings → Publishing → 301 redirects and do not take effect until the site is published.
Webflow needs extra care around CMS collection paths, shared components, reference fields, wildcard order, and exported sites. Start with the public site, not only the Designer preview, because publishing state determines what visitors and crawlers can reach.
Fast Webflow Triage
| Change | What to verify |
|---|---|
| Static page slug changed | The old-to-new redirect option was selected and the site was republished |
| CMS collection path changed | A wildcard or complete item-level map covers every old collection URL |
| CMS item deleted or drafted | References and links to the item were updated; a relevant redirect exists if needed |
| Shared component edited | Header, footer, navigation, and every component instance resolve correctly |
| Redirect CSV imported | Existing rules were included in the file and still exist after import |
| Site exported to another host | Redirects and CMS-dependent routes were recreated outside Webflow |
Why Webflow Sites Get Broken Links
Knowing the causes helps you avoid them. Here are the most common reasons Webflow sites accumulate dead links.
CMS Collection Slug Changes
This is the single biggest source of broken links in Webflow. Every CMS collection has a URL slug that forms the base path for all its items. Your blog collection might use /blog/, your case studies /work/, your team page /team/.
When you change a collection slug — say, from /blog/ to /articles/ — every single CMS item URL changes with it. A post at /blog/seo-tips-for-startups becomes /articles/seo-tips-for-startups. Every external link, every Google-indexed page, every internal reference to the old path now returns a 404.
When you change a static page slug, Webflow can create the old-to-new 301 if you select Permanently redirect the old URL to this new one. Confirm the option rather than assuming the rule exists. Collection-level path changes need their own redirect plan, usually a wildcard rule or a complete old-to-new map.
CMS Item Deletions
When you delete a CMS item — a blog post, a portfolio project, a team member — its URL immediately stops working. Every link pointing to that item from other pages on your site, from Google's index, from social media, from external sites — all broken instantly.
Unlike static pages that sit visibly in your page tree, CMS items can number in the hundreds. It's easy to delete a batch of outdated items without thinking about the URLs they leave behind.
Static Page Deletions and Unpublishing
Deleting a static page removes its URL immediately. If you've shared that page link anywhere — in emails, on social media, in your navigation — those links are now dead.
Unpublishing has the same effect. The page still exists in your Webflow designer, but visitors and search engines get a 404. This creates a confusing situation where the page looks "fine" in your editor but is actually invisible to the public.
Template and Theme Switches
Switching to a new Webflow template — or heavily restructuring your existing one — can break links in unexpected ways. If your old template had pages at /about-us, /services/web-design, and /pricing, and the new template uses different slugs or a different page hierarchy, every existing link to those old URLs breaks.
Custom code in the old template that generated links (in headers, footers, or embedded scripts) won't carry over to the new template either.
Reference and Multi-Reference Field Issues
Webflow's CMS supports reference fields and multi-reference fields that link CMS items to each other. A blog post might reference an author from an Authors collection, or a project might reference multiple categories from a Categories collection.
When you delete a referenced CMS item, the reference field doesn't automatically clear itself. Depending on how your template renders these references, you might end up with links pointing to deleted items — visible on the page but leading to 404 errors when clicked.
External Link Decay
This one isn't Webflow-specific, but it affects every Webflow site. Over time, external websites you link to change their URLs, go offline, or restructure their content. The risk grows with the number and age of outbound references; this is the broader link rot problem.
How to Find Broken Links on Your Webflow Site
You can't fix what you haven't found. Here are the most effective methods, ordered from quickest to most thorough.
Method 1: Chrome Extension (Page or Whole Site)
Open the extension on a landing page or CMS item to check that page. Use Whole site after changing collection slugs, publishing a redesign, or replacing shared navigation and footer components.
- Install the Broken Link Checker, choose Whole site, and confirm the published Webflow domain.
- Set a page limit, start the scan, and keep the scan tab open and in front while pages render.
- Filter to Broken, expand Found on, and use the magnifying glass to highlight the source link.
- Open that page in Webflow. Edit a static element in the Designer, update the relevant CMS field for a Collection page, or repair the Component when the same link repeats in navigation, cards, or the footer.
- Publish to the scanned domain and run Scan again. Export CSV first when several CMS items or team members are involved.
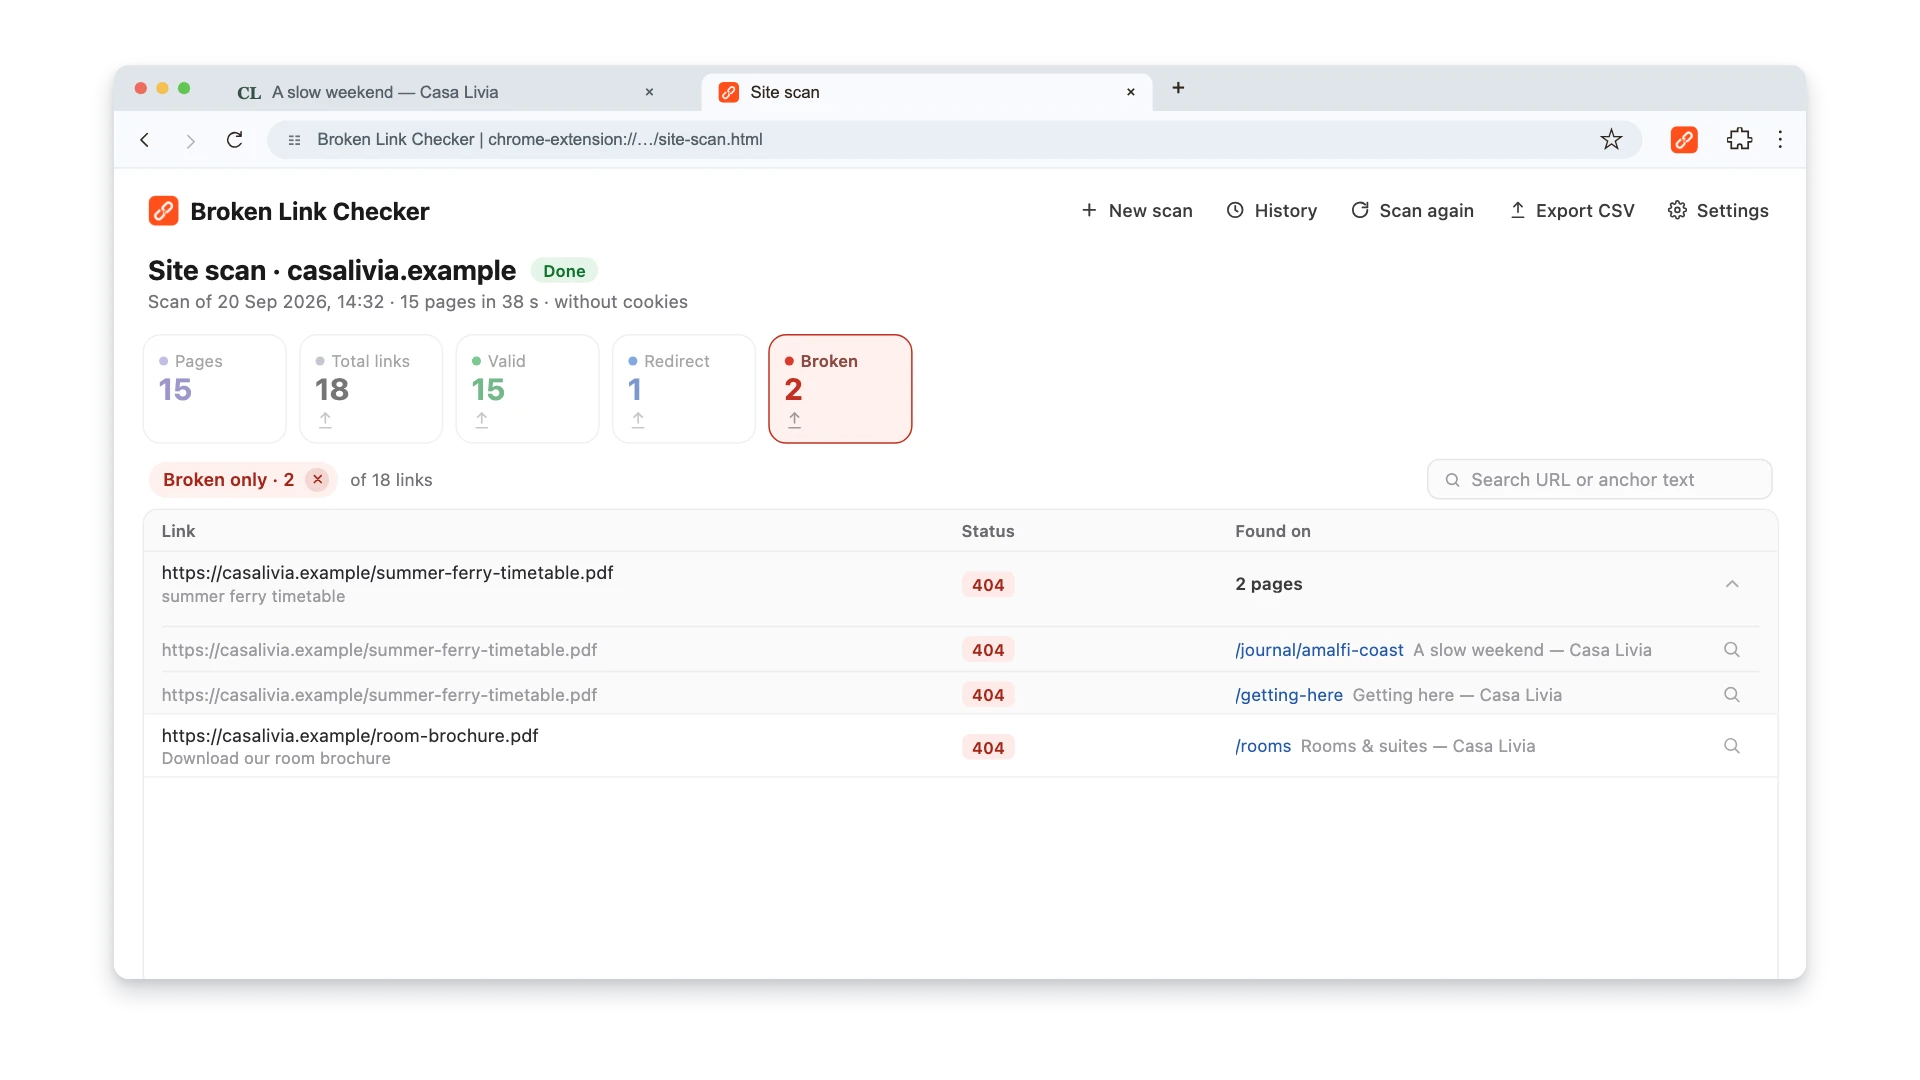
Watch this 3-minute walkthrough to see a page check, a whole-site scan, and report export on an example website. Use the same checking steps on your published Webflow site, then follow the repair instructions below to edit links in your platform.
Method 2: Google Search Console
If your Webflow site is connected to Google Search Console (it should be), go to Pages and look for "Not found (404)" under the "Why pages aren't indexed" section.
This shows every URL where Googlebot hit a dead end on your site. It's the most authoritative source for finding broken URLs because it uses Google's actual crawl data — the same data that determines your rankings.
Search Console is especially useful for Webflow sites because it catches broken URLs that result from CMS collection slug changes. When you rename a collection slug, Google still has the old URLs in its index and will report them as 404s.
The Links report in Search Console also shows which external sites link to your broken pages, helping you prioritize which redirects to set up first.
Downside: Search Console only shows pages Google has attempted to crawl. It won't catch broken outbound links on your pages pointing to external sites.
Method 3: Screaming Frog (Full Site Crawl)
For a comprehensive audit, Screaming Frog SEO Spider crawls your entire Webflow site and reports every broken link — internal and external. The free version crawls up to 500 URLs, which covers most Webflow sites.
Enter your site URL, let it crawl, then filter results by Response Codes → Client Error (4xx). You'll see every broken link, which page it appears on, and the anchor text used.
Screaming Frog is particularly valuable for Webflow sites because it:
- Finds broken links inside CMS collection list items that you might miss manually
- Detects redirect chains (one redirect pointing to another redirect)
- Catches broken links in footer and header components that appear on every page
- Identifies broken image links and other resource errors
Method 4: Online Crawl Tools
If you don't want to install desktop software, browser-based tools work too:
- Ahrefs Site Audit — crawls your site and reports broken internal and external links with detailed context. Paid tool, but thorough.
- Semrush Site Audit — similar to Ahrefs, with a focus on SEO issues including broken links.
- Dead Link Checker (deadlinkchecker.com) — free online tool that crawls your site and lists broken links. Good for quick audits of smaller sites.
For most Webflow sites, the combination of the Broken Link Checker extension for page checks or a whole-site scan and Google Search Console for ongoing monitoring covers the essentials. Broken Link Checker includes 3 free checks shared by both modes, with paid plans for continued use. Read our full guide on how to find broken links for more methods.
How to Fix Broken Links in Webflow
Once you've identified broken links, here's how to fix them — from Webflow's built-in tools to manual content updates.
Set Up 301 Redirects in Webflow
Webflow has a built-in 301 redirect system. This is your primary tool for fixing broken links caused by URL changes or deleted pages.
- Open your Webflow project and go to Site Settings.
- Click the Publishing tab.
- Scroll down to the 301 Redirects section.
- In the Old Path field, enter the broken URL path — for example,
/blog/old-post-title. - In the Redirect to Path field, enter the destination URL — for example,
/blog/new-post-titleor just/blog. - Click Add redirect, then Publish your site.
Critical detail: Redirects in Webflow only take effect after you publish. If you add redirects but forget to publish, they won't work. This is the most common reason Webflow redirects "don't work."
Use Wildcard Redirects for Collection Slug Changes
When you change a CMS collection slug (for example, from /blog/ to /articles/), every item URL changes. Redirecting each item individually would be tedious. Instead, use Webflow's pattern-based redirects:
- Old Path:
/blog/(.*) - Redirect to:
/articles/%1
The (.*) captures everything after /blog/, and %1 inserts it into the new path. So /blog/seo-tips redirects to /articles/seo-tips, /blog/webflow-guide redirects to /articles/webflow-guide, and so on — all with a single redirect rule.
This works for:
- Collection slug changes
- Restructuring page hierarchies (e.g.,
/services/designto/what-we-do/design) - Migrating URL patterns from a previous platform
Bulk Import/Export Redirects via CSV
For large numbers of redirects — common during site migrations or major restructuring — Webflow supports CSV import and export for 301 redirects.
- Prepare a CSV file with two columns: Old Path and Redirect to Path.
- In Site Settings → Publishing → 301 Redirects, click Import and upload your CSV.
- Review the redirects and publish your site.
Example CSV:
/old-blog/post-one,/blog/post-one
/old-blog/post-two,/blog/post-two
/services/old-service,/services/new-service
/team/former-member,/about
You can also export existing redirects as CSV to back them up before making bulk changes.
Do this before every import: export the current redirect list, append new rules to that file, and keep the backup. Webflow's current import behavior replaces existing redirects rather than simply adding the uploaded rows. Invalid rules can also cause the import to fail. See Webflow's official redirect import and export instructions before a production migration.
Fix Links in CMS Content
Redirects handle incoming traffic from external sources and search engines. But you should also fix broken links directly in your CMS content:
- Open the CMS Collection containing the item with broken links.
- Edit the item and find the Rich Text field containing the broken link.
- Click the link, update the URL, and save.
- Publish the site.
For links embedded in Link Blocks, Button elements, or other components on CMS collection pages:
- Open the Designer.
- Navigate to the CMS collection template page.
- Select the element with the broken link.
- Update the URL in the element settings panel.
- Publish.
Fix Links in Static Pages and Components
For broken links in static pages, navigation, footers, or other global components:
- Open the Designer.
- Navigate to the page or component containing the broken link.
- Select the element (text link, button, image link, nav item).
- Update the URL in the settings panel or link settings dialog.
- Check symbols and components — a broken link in a shared component affects every page that uses it.
- Publish.
Handle Broken Reference Fields
If a CMS item references a deleted item through a reference or multi-reference field:
- Open the CMS item that contains the broken reference.
- Find the reference field and clear it or select a new referenced item.
- Save and publish.
To prevent this issue, check for and update references before deleting any CMS item that other items might reference.
Webflow Hosting vs. External Hosting: Impact on Broken Links
Where you host your Webflow site affects how you handle broken links.
Webflow-Hosted Sites
If you host with Webflow (the default and most common setup), you get:
- Built-in 301 redirects through Site Settings
- Automatic SSL handling (no mixed-content broken links)
- CMS functionality that works natively
- Redirects that apply immediately after publishing
This is the straightforward scenario. All the methods described above work as expected.
Exported Webflow Sites (Custom Hosting)
If you export your Webflow site and host it elsewhere, the situation is different:
- CMS content is not exported. Your CMS collection pages disappear entirely. Collection Lists throughout your site are removed. Every link to a CMS item becomes a broken link.
- Redirects don't transfer. Your 301 redirects are configured in Webflow's hosting layer, not in the exported code. You need to set up redirects on your new hosting platform (via
.htaccess, Nginx config, Netlify_redirects, or your hosting provider's redirect tool). - Forms stop working. Webflow's native forms rely on Webflow hosting. Links to form confirmation pages may break.
If you're exporting your Webflow site, plan for these broken links before migrating. Map all CMS URLs and set up corresponding redirects on your new hosting platform. Run a full broken link check immediately after deploying the exported site.
Webflow-Specific Broken Link Patterns
Webflow's architecture creates some unique broken link situations that are worth understanding.
CMS Collection Page Slug Conflicts
Webflow doesn't allow a static page and a CMS collection to share the same slug. If you have a static page at /blog and try to create a CMS collection with the slug /blog, you'll get a conflict error.
This becomes a broken link issue when you try to restructure: deleting the static page to free up the slug for a collection, or vice versa. During the transition, links to the old path may break if the timing isn't right.
Solution: Set up a redirect from the old URL structure before making the switch. Create the redirect, publish, then make the structural change.
Dynamic Page Conditional Visibility
If you use conditional visibility to effectively "unpublish" a CMS item, the URL still returns 200 but the page renders blank — which Google may flag as a soft 404. Set the item to Draft or delete it and add a redirect instead.
Collection List Link Blocks
In Webflow, Collection Lists render links to CMS items dynamically. When a referenced CMS item is deleted, the Collection List automatically excludes it — so the broken link doesn't appear in the list itself.
But if you have hardcoded links to specific CMS items outside of Collection Lists (in rich text, custom code blocks, or static page content), those links will break when the item is deleted. The Collection List self-heals; your manual links don't.
Pagination on CMS Collections
If your CMS collection has pagination and you delete a significant number of items, higher-numbered pagination pages (like /blog?page=5) may return empty results or 404 errors. Google may have these pagination URLs indexed.
These typically resolve as Google re-crawls your site, but you can speed up the process by requesting re-indexing of affected pages in Google Search Console.
Preventing Broken Links in Webflow
Fixing broken links is reactive. These practices stop them from forming in the first place.
Create Redirects Before Deleting Content
Make this your standard workflow. Before you delete or unpublish any page or CMS item:
- Note the current URL.
- Go to Site Settings → Publishing → 301 Redirects.
- Add a redirect from the old URL to the most relevant alternative page.
- Publish the redirect.
- Then delete or unpublish the content.
This takes under a minute and prevents the most common source of Webflow broken links.
Lock Down Collection Slugs Early
Choose your CMS collection slugs carefully before building out content. Changing a collection slug from /blog/ to /articles/ after you have 100 published posts means 100 URLs that need redirecting.
Decide on your URL structure during the design phase, not after launch. Consider:
- Keep slugs short and descriptive:
/blog/,/work/,/team/ - Avoid date-based slugs that tie content to a specific time period
- Use lowercase with hyphens (Webflow enforces this anyway)
Audit Before and After Template Changes
Before switching templates or making major structural changes:
- Export your current redirects as CSV (backup).
- Document all current page URLs.
- Make the template change.
- Run the Broken Link Checker extension on key pages.
- Check Google Search Console for new 404 errors over the following week.
- Add redirects for any broken URLs.
Clean Up Reference Fields Before Deleting CMS Items
Before deleting a CMS item that other items might reference:
- Search for the item name in your CMS to find items that reference it.
- Update or clear those reference fields.
- Then delete the item.
This prevents broken reference links from appearing on CMS collection pages.
Run Monthly Link Checks
Add a monthly link check to your site maintenance routine:
- Check Google Search Console for new 404 errors.
- Run the Broken Link Checker extension on your homepage, key landing pages, and a sample of CMS items.
- Review your 301 redirects list for outdated entries.
- Check a handful of external links in your content for link decay.
Fifteen minutes a month catches problems before they compound. For a more detailed strategy, read our guide on link rot prevention.
FAQ
Does Webflow automatically create redirects when I change a page slug?
For a static page, Webflow offers a Permanently redirect the old URL to this new one option when you change the slug. Select it, then publish and test the old URL. Do not assume the same rule covers a CMS collection-level path change; map that change explicitly, often with a wildcard redirect. Webflow documents the current workflow in its 301 redirect guide.
How many 301 redirects can I have in Webflow?
Webflow doesn't publish a hard limit on the number of 301 redirects, though Webflow recommends keeping redirects under 1,000 for optimal performance, as each redirect is added to the site's manifest.json file and increases publish times. For most sites, you won't hit practical limits. If you're managing hundreds of redirects after a migration, consider using wildcard patterns to consolidate them.
Can I use wildcard redirects in Webflow?
Yes. Webflow supports pattern-based redirects using (.*) as a wildcard and %1, %2, etc. as capture group references. For example, redirecting /old-path/(.*) to /new-path/%1 will redirect all subpages while preserving the URL structure. This is essential for CMS collection slug changes.
Will broken links on my Webflow site hurt SEO?
They can. Internal broken links interrupt navigation and crawling, while a deleted URL with backlinks or search visibility stops serving the page people expected. Prioritize URLs that receive traffic, backlinks, or important internal links instead of treating every historical 404 as equally urgent.
What happens to CMS content if I export my Webflow site?
Webflow's CMS functionality does not move with a standard code export. Before switching hosts, inventory every CMS-dependent route, decide how that content will be recreated, and implement Webflow's redirect rules on the destination hosting layer. Use the pre-redesign link audit checklist for the old-to-new map. For other CMS workflows, see the guides for WordPress, Shopify, and Wix.

Pavel Molyanov
Creator of Broken Link Checker
Content marketer with 10+ years of experience. Founder of a content marketing agency. Writing about SEO, content workflows, and website maintenance.

Check Your Links in One Click
Broken Link Checker finds broken links and redirects on any page or across your whole website, and works in Google Docs and Sheets. Try 3 checks free, with no signup or card required.