Website Link Audit Before a Redesign: The Complete Checklist
· Updated
A safe redesign needs three link snapshots: the current live site, the staging site, and the final production site after launch. The core deliverable is an old-to-new URL map with an owner and verification status for every URL that changes.
Do not approve launch from screenshots alone. Approve it when the redirect map is implemented, internal links point directly to final URLs, important external links work, and a crawl of production matches the intended structure.
Launch Gates at a Glance
| Gate | Evidence required |
|---|---|
| Current-site inventory | Crawl export, sitemap URLs, top landing pages, and backlink destinations |
| URL decisions | Every old URL marked keep, redirect, consolidate, or intentionally remove |
| Redirect implementation | Tested status and final destination for every mapped old URL |
| Staging link check | No unintended internal 4xx/5xx responses, loops, or redirect chains |
| Production verification | Fresh crawl plus manual tests of navigation, templates, forms, and top landing pages |
| Monitoring handoff | Named owner, Search Console review dates, analytics annotation, and issue log |
Why Redesigns Break Links
A redesign typically changes at least one of these things — and often all of them:
URL structure. You switch from /blog/2024/post-title to /articles/post-title. Or you reorganize sections: /services/web-design becomes /what-we-do/websites. Every old URL that doesn't get a redirect becomes a broken link.
CMS platform. Migrating from WordPress to Next.js, or Squarespace to Webflow, or anything to anything else. Different platforms generate different URL patterns. Slugs might change. File paths definitely change.
Content consolidation. You merge three old pages into one comprehensive guide. You delete outdated blog posts. You archive a section that nobody visits. Every deleted page needs to go somewhere — or it becomes a 404.
Domain changes. Rebranding from oldname.com to newname.com means every single URL on your site changes. Miss a redirect and you lose whatever SEO equity that page had.
Navigation restructuring. You redesign your menu, move pages to different sections, create new categories. The internal links that connected everything need to follow.
The common thread: URLs change, but the links pointing to those URLs — from your own pages, from other websites, from Google's index — don't update themselves.
Step 1: Crawl Your Current Site
Before changing anything, you need a complete map of your existing site. Every URL, every link, every connection.
Export All URLs
Use a crawler like Screaming Frog to spider your entire site. This gives you:
- Every page URL on your site
- The HTTP status code for each page (200, 301, 404, etc.)
- All internal links and where they point
- All external links on your pages
- Page titles, meta descriptions, and other SEO metadata
Export this data to a spreadsheet. This is your baseline — the "before" snapshot that you'll compare against after launch.
Check What's Already Broken
Run a whole-site scan with the Broken Link Checker extension to capture the link results before the redesign. Export the report, repeat the scan on staging or production after the redesign, and compare the link and source-page rows.
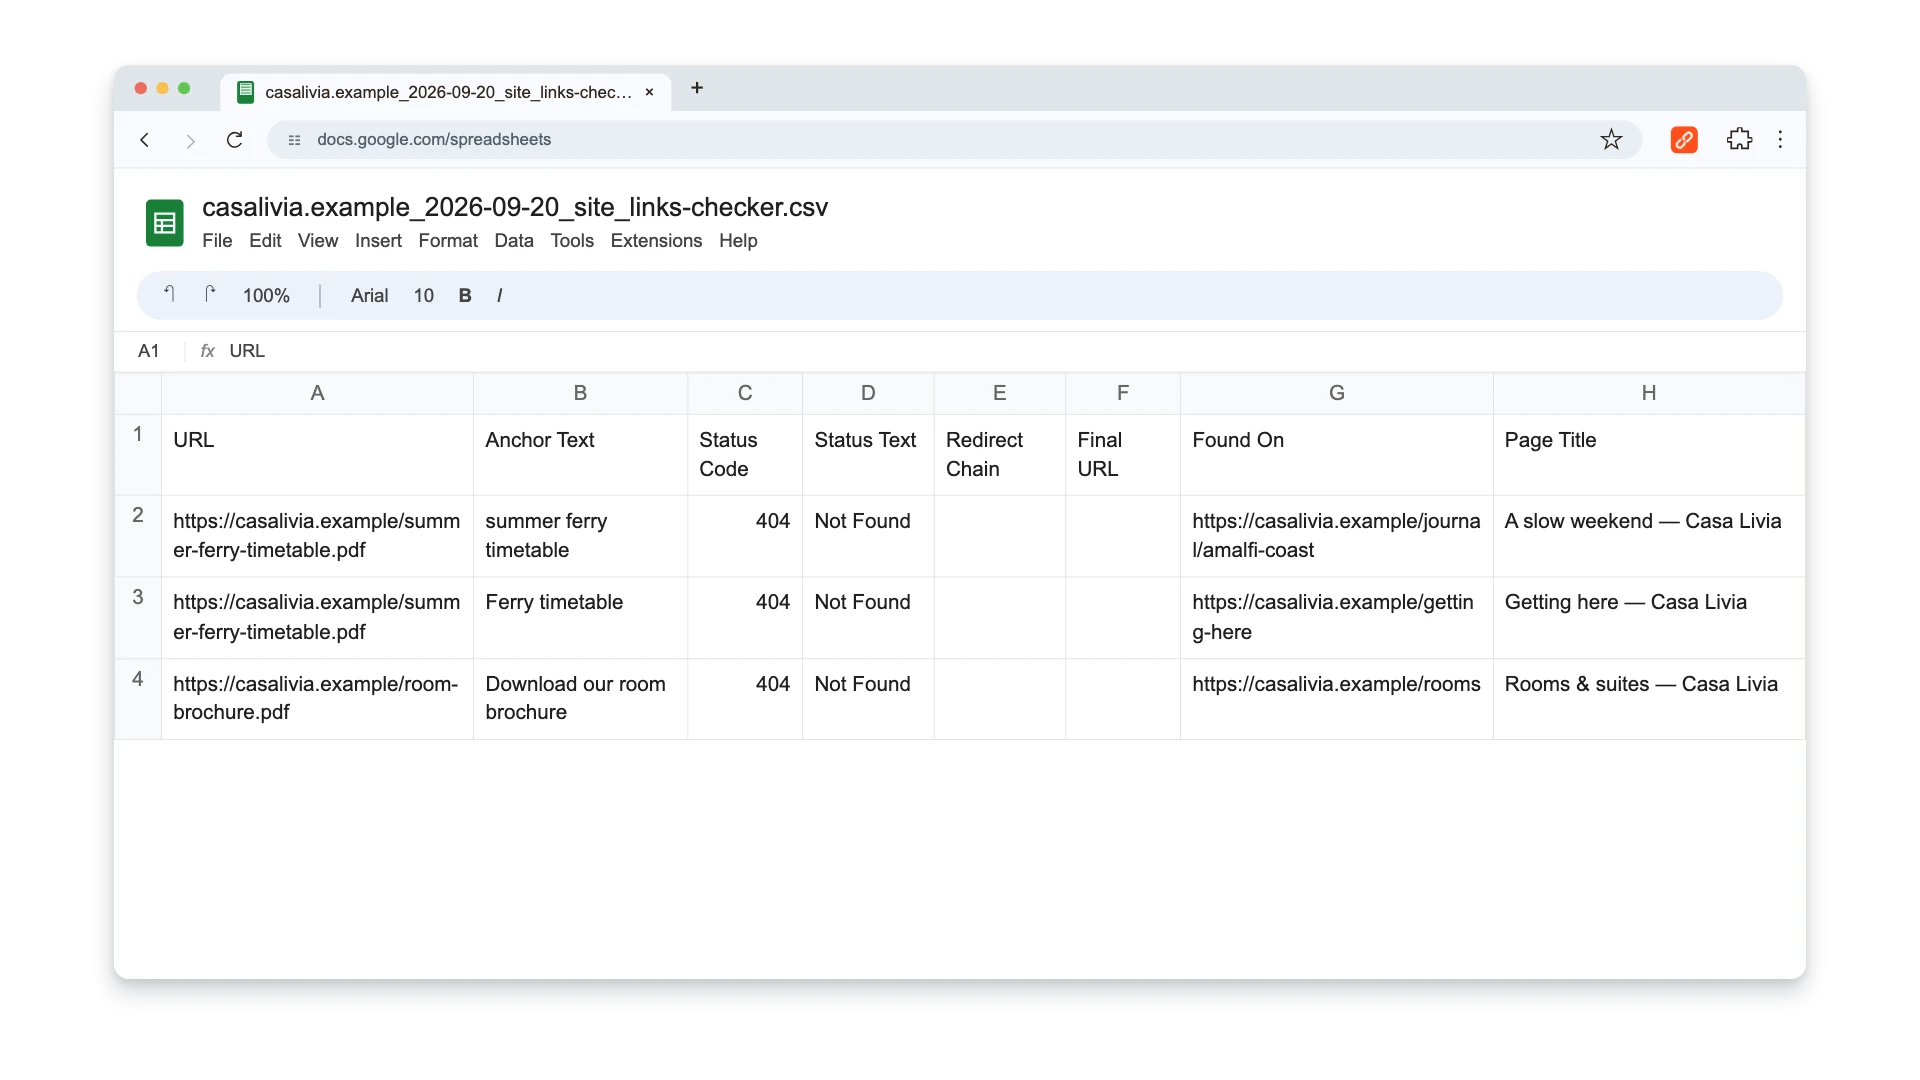
The CSV is a link audit snapshot, not a complete content inventory: it includes each link and source URL plus response and redirect details, but it does not replace a crawler export of every page title, meta description, canonical, or other SEO metadata. Keep that separate inventory for URL mapping and content decisions.
For a full site scan, see our guide to finding broken links on any website — it covers seven methods from free browser extensions to full-site crawlers.
Step 2: Inventory Your Backlinks
Other websites link to specific pages on your site. These backlinks are one of the most valuable SEO assets you have, and a redesign can destroy them instantly if the destination URLs change without redirects.
Export Your Backlink Profile
Use Google Search Console (free) or a tool like Ahrefs to get a list of all external links pointing to your site. You need two pieces of information for each backlink:
- The URL on your site that the backlink points to
- The referring page (where the link lives on the other site)
Sort this list by the pages on your site that receive the most backlinks. These are your highest-priority URLs — the ones that absolutely must have working redirects if their URLs change.
Identify High-Value Pages
Not all pages are equal. Prioritize redirect setup for pages that:
- Have multiple backlinks from external sites
- Rank on page 1 or 2 for target keywords
- Get significant organic traffic (check Google Analytics)
- Are linked to from your own important pages
A page with 50 backlinks from authoritative sites that suddenly returns a 404 is a significant SEO loss. A page with zero backlinks and ten visits per month is less urgent (though you should still redirect it).
Step 3: Build Your Redirect Map
This is the single most important deliverable of a link audit. A redirect map is a spreadsheet that maps every old URL to its new destination.
Create the Spreadsheet
Set up three columns:
| Old URL | Decision / new URL | Reason | Owner | Tested |
|---|---|---|---|---|
| /blog/2024/old-post | /articles/old-post | Same article, new structure | Content | No |
| /services/web-design | /what-we-do/websites | Direct service replacement | SEO | No |
| /team/john-doe | /about | Team profile intentionally consolidated | Content | No |
| /temporary-promo | 410 Gone | Expired campaign, no replacement | Engineering | No |
301 (Permanent Redirect) — use for pages that moved to a new URL. This passes link equity to the new destination. Use this for the vast majority of your redirects.
410 (Gone) — use for pages you're intentionally removing with no replacement. This tells search engines "this page is gone, stop looking for it." Better than a 404 because it's an explicit signal rather than an error.
Rules for Good Redirects
Redirect to the most relevant page. Don't redirect everything to the homepage. If /blog/seo-tips is being removed, redirect it to /articles/seo-guide — the closest equivalent. Homepage redirects are a last resort and pass minimal link equity.
Avoid redirect chains. If /page-a already redirects to /page-b, and your redesign moves /page-b to /page-c, update the first redirect so /page-a goes directly to /page-c. Chains slow down page loads and can break if any link in the chain fails.
Don't redirect to pages that will also redirect. This creates chains. Check your redirect map for loops and chains before implementing.
Include every URL that gets traffic or backlinks. Even pages you think nobody visits might have backlinks or rank for long-tail keywords. Check analytics and backlink data before deciding a page doesn't need a redirect.
Step 4: Check Internal Links in the New Design
Your new site has its own internal linking structure. Before launch, verify it works.
Scan the Staging Site
If your redesigned site is on a staging URL, crawl it the same way you crawled the live site. Look for:
- Broken internal links — links between your own pages that return 404 or 500 errors
- Links pointing to old URLs — content or templates that still reference the old URL structure
- Orphaned pages — pages that exist but have no internal links pointing to them (search engines have trouble finding these)
- Redirect chains — links that go through two or more redirects before reaching the destination
Test Key User Paths
Beyond automated crawling, manually walk through the most important paths on your new site:
- Homepage → main service/product pages
- Blog listing → individual blog posts
- Navigation menu → every linked page
- Footer links → all destinations
- CTA buttons → their target pages
- Search functionality → result page links
Click every link. A crawler catches 404 errors, but a human catches links that technically work but point to the wrong page.
Step 5: Verify External Links
Your content likely links to external websites — references, tools, resources, citations. A redesign is the perfect time to verify these still work.
Run the Broken Link Checker extension on the staging site or its key content pages. A whole-site scan checks public pages on the same normalized host and tests the internal and external links it finds; a current-page check is useful where staging access or page state prevents a public crawl.
External links break independently of your redesign — sites go down, pages get reorganized, domains expire. But launching a redesigned site with broken external links looks sloppy. Clean them up while you're already doing the work.
Step 6: Implement Redirects Before Launch
Don't launch first and add redirects later. Implement your redirect map on the new site before it goes live.
Where to Add Redirects
Depending on your tech stack:
- Next.js —
next.config.jsredirects array or middleware - WordPress — Redirection plugin or
.htaccess - Nginx —
nginx.confor site config file - Apache —
.htaccessfile - Cloudflare — Page Rules or Bulk Redirects
- Vercel/Netlify —
vercel.jsonor_redirectsfile
Whichever method you use, test every redirect before launch. A typo in a redirect rule can send thousands of visitors to the wrong page.
Test Your Redirects
After implementing, verify that:
- Permanently moved URLs return 301 status codes; use a temporary redirect only when the move is genuinely temporary
- Each old URL redirects to the correct new destination
- No redirect chains exist (old → intermediate → final should be old → final)
- The redirect file/configuration has no syntax errors
You can test individual redirects by typing old URLs in your browser and checking where they land. For bulk testing, use a crawler on your staging site with the old URL list.
Step 7: Post-Launch Verification
The first week after launch is critical. This is when problems surface.
Monitor Search Console
Review Google Search Console frequently during the first two weeks after launch. Look for:
- Spike in 404 errors — URLs that didn't get redirected
- Drop in indexed pages — pages that Google can't find anymore
- Crawl errors — any new server errors
New 404s will appear. No redirect map is perfect. The goal is to catch them quickly and add redirects before they affect your rankings.
Check Your Top Pages
Open Google Analytics (or whatever analytics tool you use) and compare traffic to your top 20 pages before and after launch. If a page that used to get 500 visits/week suddenly drops to zero, something broke — probably a missing redirect.
Run a Full Link Audit
One week after launch, crawl the new site completely and compare against your baseline. Check:
- Are all old URLs properly redirecting?
- Are all new internal links working?
- Did any external links break during the migration?
- Are there any orphaned pages with no internal links?
Keep Redirects Permanent
Don't remove redirects after a few months "because it's been long enough." Backlinks from external sites will point to your old URLs forever. Remove the redirect and those backlinks break. Keep them indefinitely.
Build the redirect map early, verify it thoroughly, and monitor after launch. The Broken Link Checker extension provides an on-demand site link report and before-and-after CSVs; retain a separate full metadata and old-URL inventory for the redesign. For implementation details, use the platform guide for WordPress, Shopify, Webflow, Wix, or Squarespace. For more on why broken links matter, read what broken links are and their SEO impact.

Pavel Molyanov
Creator of Broken Link Checker
Content marketer with 10+ years of experience. Founder of a content marketing agency. Writing about SEO, content workflows, and website maintenance.

Check Your Links in One Click
Broken Link Checker finds broken links and redirects on any page or across your whole website, and works in Google Docs and Sheets. Try 3 checks free, with no signup or card required.