How to Find Broken Links on a Website: 7 Methods That Work
· Updated
To find broken links, first choose the scope of the check. Use Broken Link Checker for one rendered page or a whole-site scan in Chrome, a desktop crawler for a configurable site audit, Google Search Console for URLs Google has encountered, and DevTools for failed images, scripts, and API requests. No single method covers all four cases.
For most website audits, the practical workflow is simple: crawl the full site, export each broken destination with its source page, verify the failures in a browser, and recheck after fixing them. If you only changed one article or landing page, a page-level check is faster and more focused.
Choose a Method by What You Need to Check
| Goal | Best method | What it finds | What it misses | Cost |
|---|---|---|---|---|
| Check a page or site in Chrome | Broken Link Checker extension | Page links or links discovered by Whole site, with source pages | Unlinked pages outside the scan’s discovery path | 3 checks free; paid plans from $2.90/month |
| Audit a small or large public site | Screaming Frog SEO Spider | Internal and external link destinations plus source pages | Orphan URLs unless you add another discovery source | Free up to 500 URLs; £199 / $279 / €245 per year |
| Review URLs Google could not fetch or index | Google Search Console | Known 404s, soft 404s, server and redirect errors | Complete outbound-link audit and undiscovered URLs | Free |
| Audit a site inside an SEO platform | Ahrefs Site Audit | Internal and external 4xx/5xx outlinks with affected pages | Content outside the configured crawl scope | Free limited audit for verified sites; Starter is $29/month |
| Run a no-install one-off check | W3C Link Checker | Links, anchors, redirects, and optional recursive checks | Large or private sites; online recursion is limited | Free |
| Monitor a WordPress site | Broken Link Checker by WPMU DEV | Links and missing images in WordPress content | Non-WordPress systems | Free plugin; cloud mode needs a free WPMU DEV account |
| Debug resources loaded by one page | Chrome DevTools | Failed documents, images, scripts, CSS, fonts, and API calls | Ordinary hyperlinks that were not requested | Free |
Prices and plan details were checked on August 24, 2026. Vendor pricing can change, so confirm it before purchasing.
What Counts as a Broken Link
A broken link points to a destination that cannot provide the expected page or file. The clearest cases are:
- 404 Not Found — the requested resource does not exist at that URL.
- 410 Gone — the resource was intentionally removed and is not expected to return.
- 5xx server error — the destination failed to serve the resource. Verify whether the failure persists before editing the link.
- DNS, connection, or timeout error — the checker could not reach the destination. These also need a retry because the outage may be temporary.
A 403 Forbidden does not always mean a visitor will see a broken page. Some sites block crawlers but work in a normal browser. A 429 Too Many Requests often means the checker ran too quickly. Verify both before removing a useful link.
Internal and External Broken Links
Internal links point to URLs on your own website. Prioritize them because you control the source and destination. Fix the source link, restore the missing page, or redirect a genuinely moved URL to its closest replacement.
External links point to another website. You cannot repair the destination, but you can replace the citation, update the URL, or remove a reference that no longer supports the page.
Redirects Need Review, Not Automatic Removal
A 301 or 302 response is not a broken link. The visitor still reaches another URL. However, an internal link should usually point directly to the final destination. This avoids unnecessary hops and prevents redirect chains from growing as the site changes.
Do not classify every redirect as an error. A short, intentional redirect may be valid, while a loop or a chain ending in a 404 is not. For when a redirect should be permanent or temporary, see 301 vs 302 redirects.
Method 1: Check a Page or Whole Site in Chrome
The Broken Link Checker Chrome extension has two manually started modes. Opening the extension checks the rendered page you have open, including pages behind a login. Whole site visits public pages on one host, discovers more URLs from links and the sitemap, and records which source pages contain each destination. If you currently use a single-page extension, the Check My Links comparison explains where the two approaches differ.
Run a Whole-Site Scan
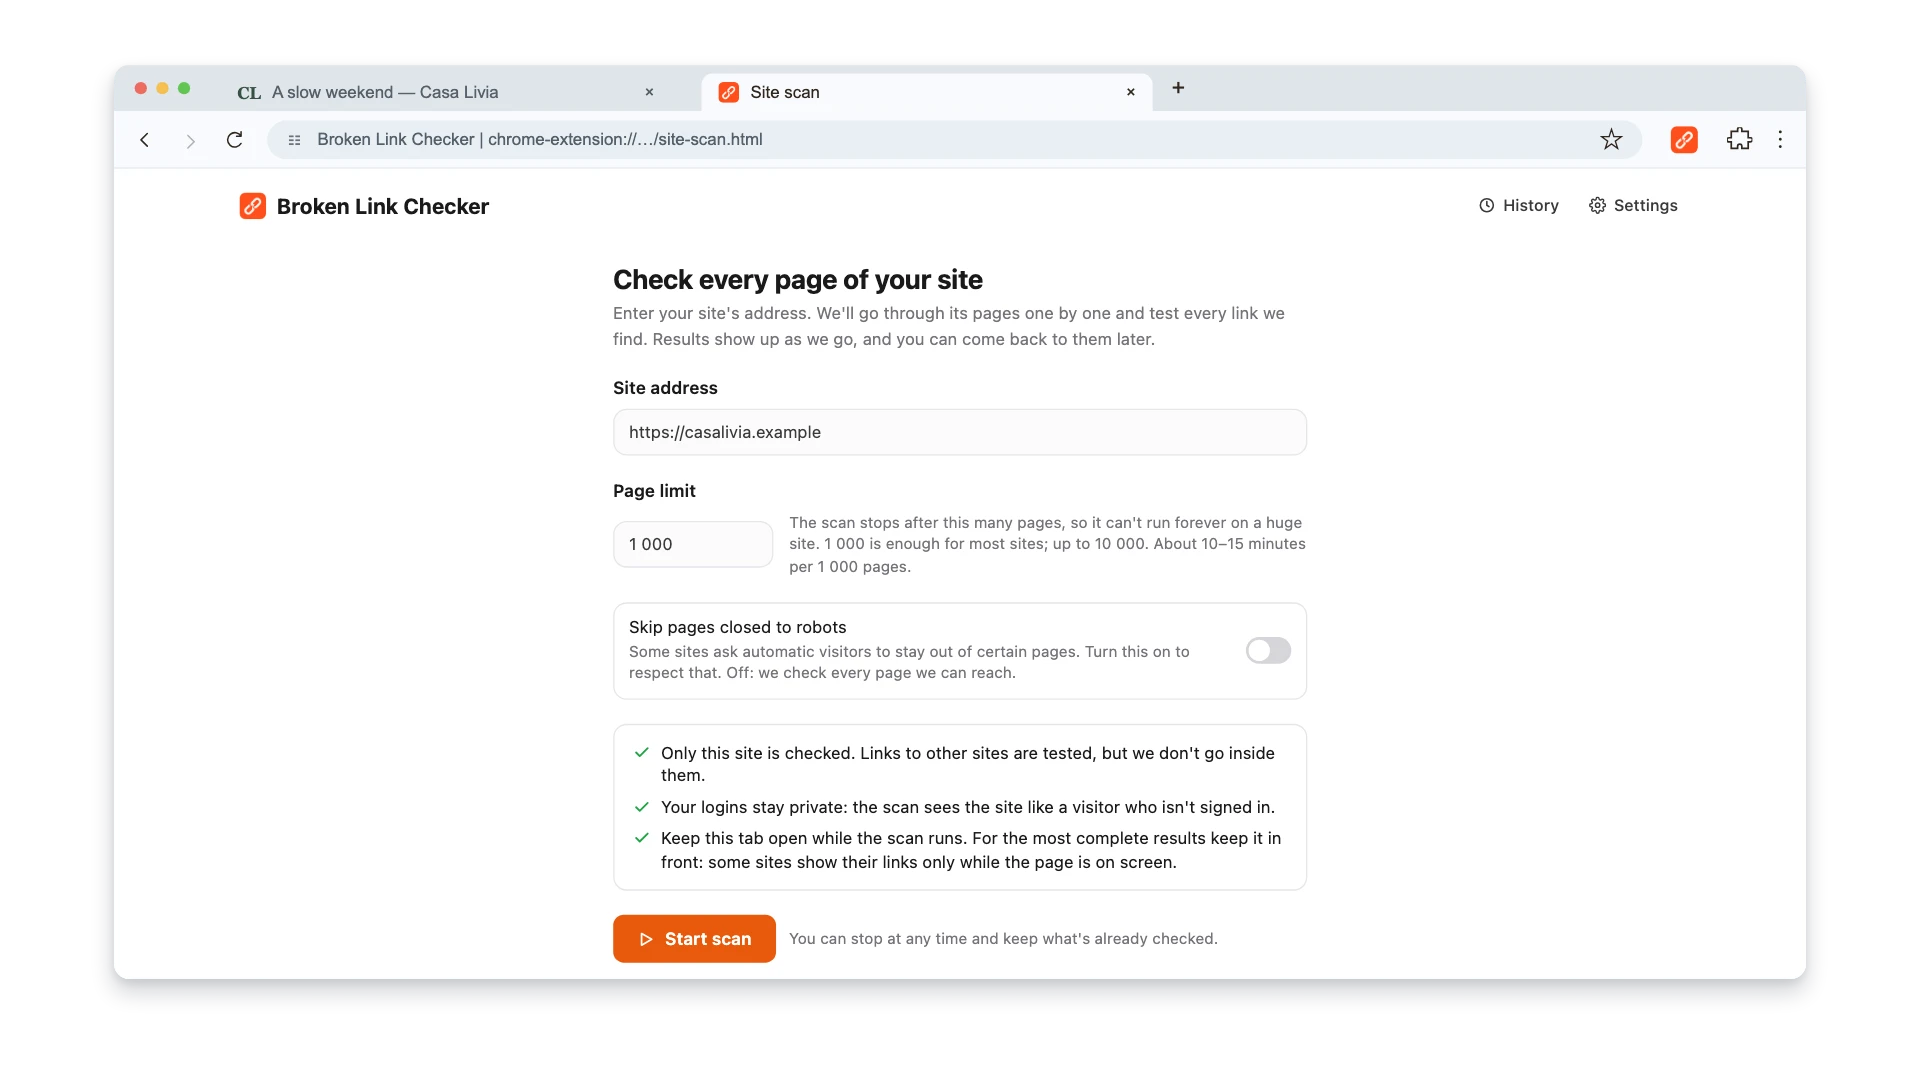
- Install the extension from the Chrome Web Store, open its popup, and select Whole site.
- Confirm the Site address and set a Page limit from 1 to 10,000. Start with a realistic cap for the site rather than assuming every reachable URL is useful.
- Click Start scan. The crawler stays on that host, treating its
wwwand non-wwwversions as the same site, while testing outbound links without crawling the external sites. It sees public pages without your login cookies. - Keep the scan tab open. When the right-hand panel is rendering pages, keep the tab in the foreground so JavaScript-driven links have the best chance of appearing. Closing the tab stops the run; an unfinished scan can be resumed later.
Turn the Report into a Repair List
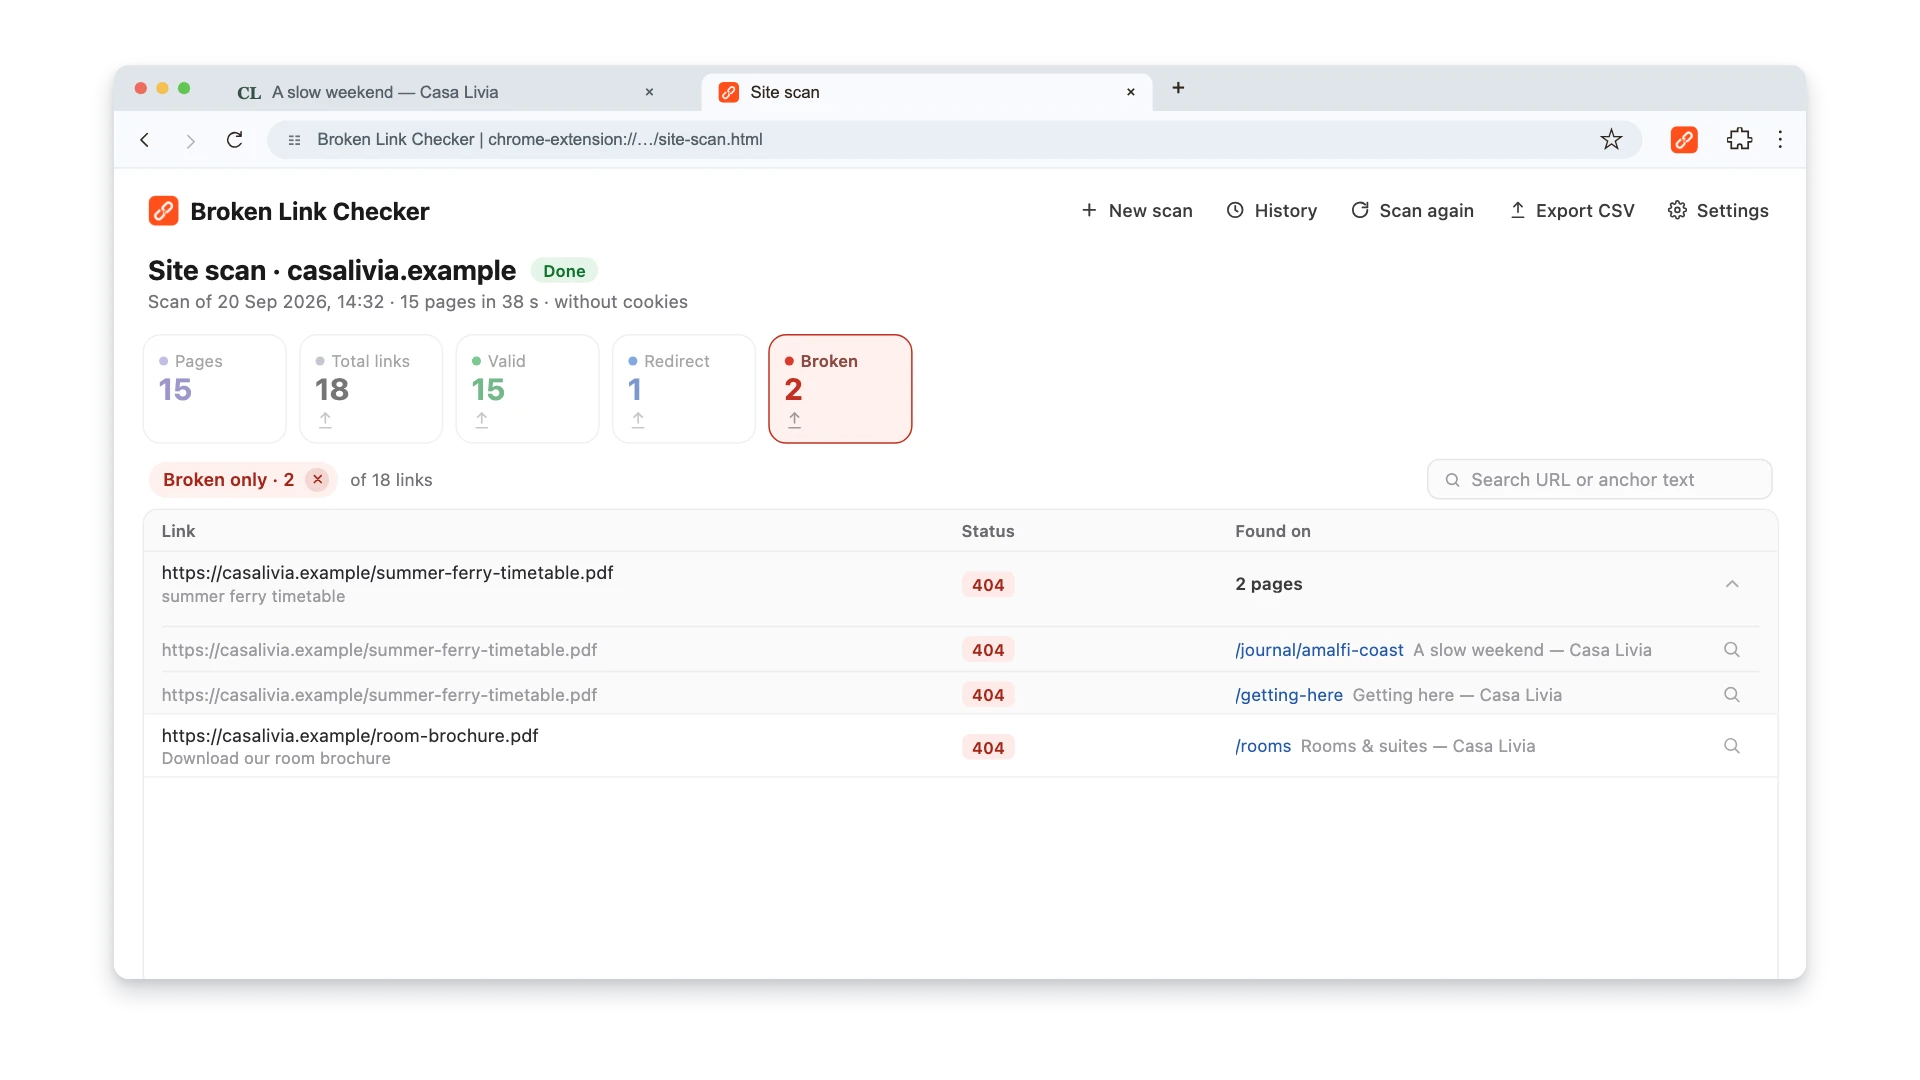
- Select Broken to focus the table on failed destinations. Expand Found on to see every discovered source page that links to the same destination.
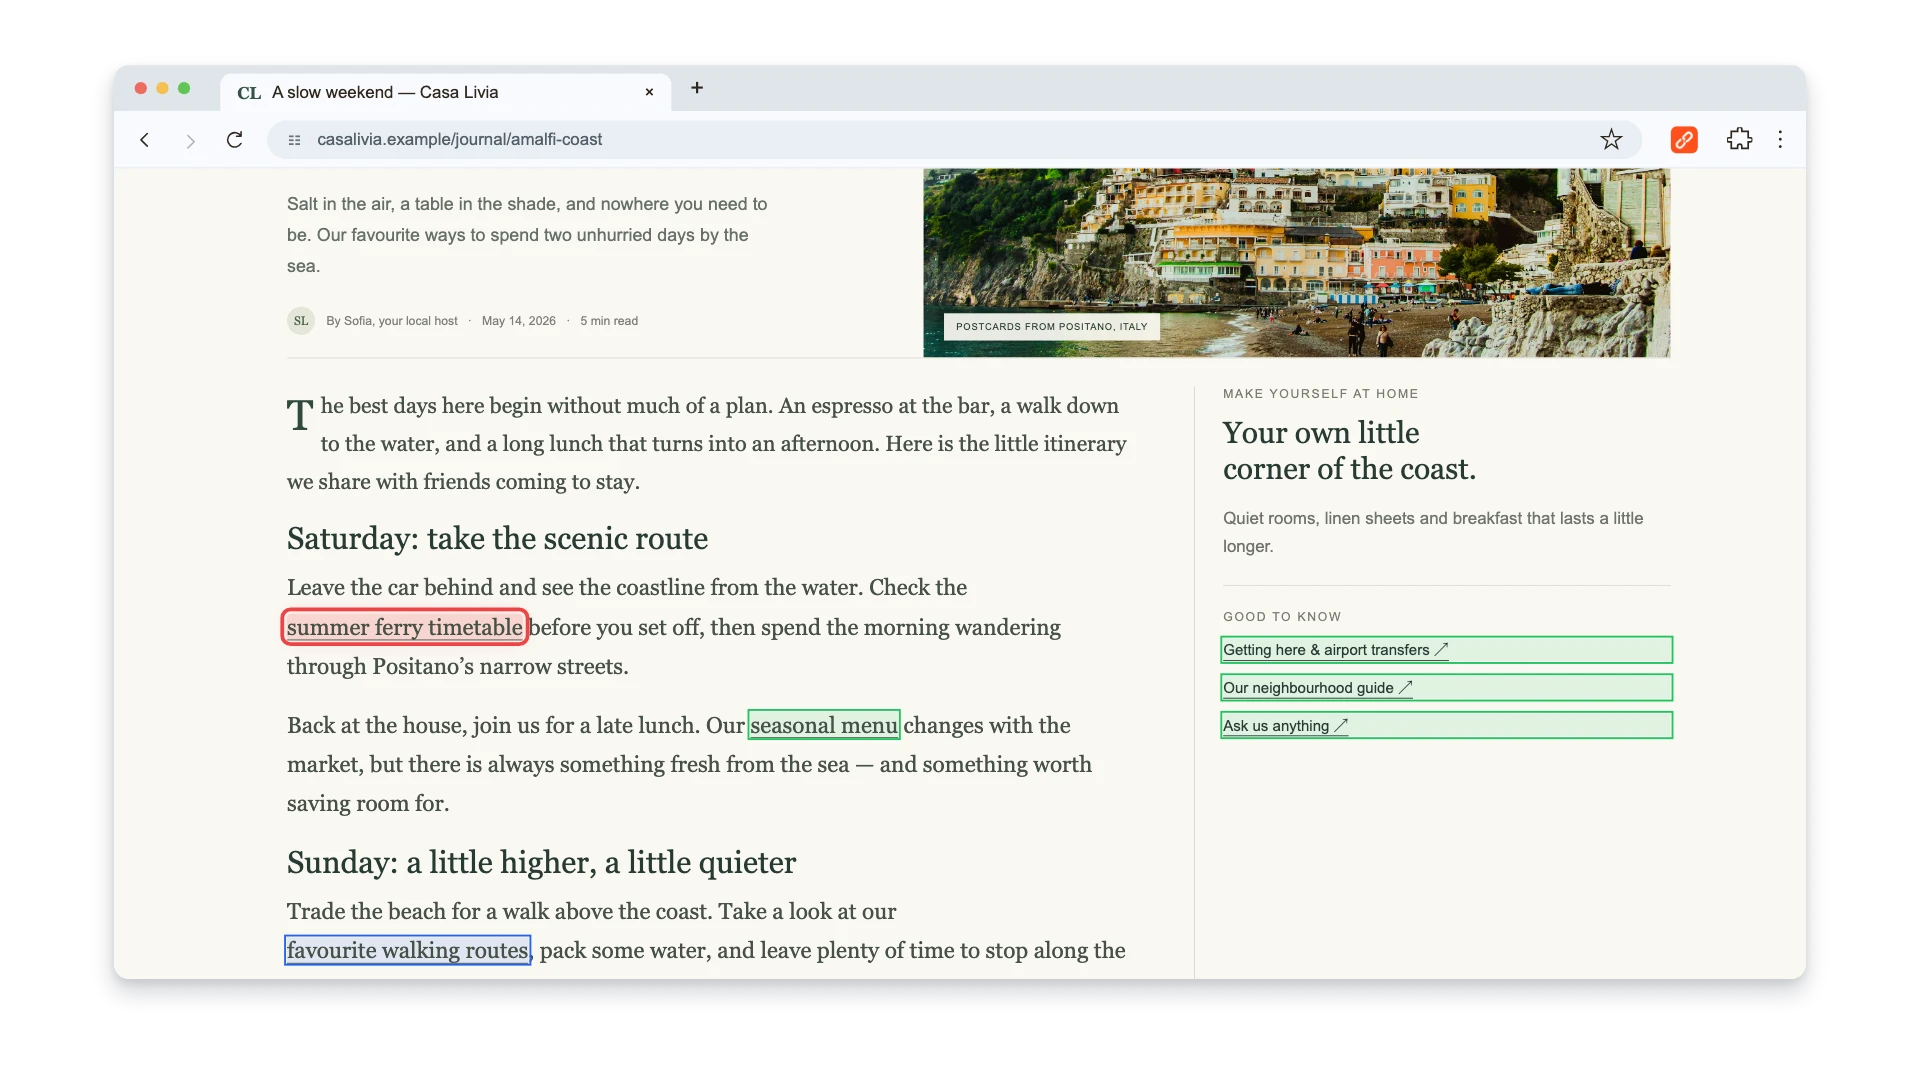
- Click the magnifying glass beside a source page to open it and highlight the exact link. Verify the failure in a normal browser before changing a useful reference, especially for
403,429, timeout, or5xxresults. - Export the broken filter or the full report as CSV. Each link-and-source row can include the URL, anchor text, status code and text, redirect chain, final URL, source page, and page title.
- Fix the link on each source page, then choose Scan again to confirm the repair with a fresh run.
The extension keeps the last 10 scans for each site locally. A fresh whole-site scan uses one of the same three free checks shared with page checks. It is a link crawler, not a scheduled monitor, full SEO audit, image checker, or soft-404 detector, and it cannot guarantee discovery of URLs that are absent from both reachable links and the sitemap.
For a quick post-edit check, open the page and click the extension icon, then filter the color-coded results, and export them if needed. This mode is useful for pre-publication QA, pages behind authentication, and links added by client-side rendering. It can also help inspect a relevant third-party page during broken link building research.
Watch the complete workflow below, including how to verify false positives and export the source pages for repairs.
Both modes are started manually. For unattended checks on a schedule, use a monitoring tool.
Method 2: Crawl the Whole Site with Screaming Frog
Screaming Frog SEO Spider follows links from a starting URL and records the response for every destination it discovers. Its main advantage is the Inlinks view, which connects a broken destination to the exact source pages that need editing.
Choosing between a desktop crawler and a Chrome extension? See our Broken Link Checker vs. Screaming Frog comparison.
Run the Crawl
- Download Screaming Frog SEO Spider.
- Enter the canonical production homepage and click Start.
- Open Response Codes after the crawl.
- Filter for Client Error (4xx) and then Server Error (5xx).
- Select a failed URL and open Inlinks in the lower panel.
- Export the source URL, destination, anchor text, and status for the repair list.
Check Configuration > Spider > Crawl > External Links when outbound links are in scope. The official configuration reference explains that external URLs can be stored and crawled independently.
If the site relies on client-side rendering, switch to JavaScript rendering before assuming the raw-HTML crawl is complete. Also add sitemap URLs or another discovery source when orphan pages matter. A normal link crawl cannot discover a page that nothing links to. For sitemap-specific cleanup, use the guide to broken URLs in XML sitemaps.
The free version crawls up to 500 URLs. Screaming Frog's official pricing page lists the individual annual license at £199, $279, or €245 and unlocks advanced configuration and unrestricted crawl size subject to available resources.
Method 3: Find URLs Google Encountered in Search Console
Google Search Console answers a narrower question: which URLs known to Google produced an indexing or fetch problem? It is useful evidence, but it is not a complete scan of links on your website.
- Open Search Console and select the correct property.
- Go to Indexing > Pages.
- In Why pages aren't indexed, review Not found (404), Soft 404, Server error (5xx), and Redirect error.
- Open a group and inspect representative URLs.
- Decide whether the URL should exist before making a change.
The official Page indexing report documentation states that the report covers URLs Google knows about. If Google has not discovered a URL, it will not appear there. Search Console also does not give you a comprehensive report of broken outbound links from your pages.
Do not try to eliminate every reported 404. Google's 404 guidance says a real 404 is appropriate when content was permanently deleted and has no replacement. Fix submitted URLs, accidental removals, bad internal links, and moved content. Leave intentionally absent URLs as 404 or 410.
For the complete decision process, see how to handle 404 errors in Google Search Console. For what every Google tool can and cannot find, see does Google have a broken link checker.
Method 4: Use Ahrefs Site Audit
Ahrefs is useful when the site is already managed as an SEO project. Site Audit reports the affected source pages and separates broken internal and external outlinks.
- Verify the website and run a Site Audit crawl.
- Open Overview or Outgoing links.
- Select Page has links to broken page.
- Review internal and external outlinks returning 4xx or 5xx.
- Export the filtered report with the affected page and failed destination.
Enable Check HTTP status of external links before the crawl if outbound destinations are part of the audit. Ahrefs' official issue documentation confirms that the report contains internal and external 4xx and 5xx columns.
Verified site owners can run limited audits with an Ahrefs free account. The current Starter plan documentation lists Starter at $29/month and Lite at $129/month. If broken link checking is your only need, a dedicated crawler is simpler. Ahrefs makes more sense when you also use its backlink and search research data. To recover incoming links pointing at deleted pages, follow the separate broken backlink reclamation workflow.
If your team uses Semrush instead, follow the Semrush broken link checker guide for the Site Audit workflow and finding the pages that contain each broken link.
Method 5: Run a No-Install Check with W3C Link Checker
The W3C Link Checker is a free browser-based option for a public page or a small section of a site. It extracts links and anchors, checks whether destinations can be reached, warns about redirects, and can follow links recursively.
- Enter the public URL.
- Run a single-document check first.
- Enable recursive checking only when you need a small site section.
- Review unreachable destinations, redirects, and broken fragment identifiers.
- Verify reported failures in your own browser.
The official W3C documentation notes that recursive checks in the online version are limited and that the service waits between requests to reduce load. It is useful for a one-off check, but a desktop or hosted crawler is better for a large recurring audit. For another popular online checker and its free limits, see the BrokenLinkCheck.com review.
Do not submit private, staging, or authenticated URLs to a public checker. Use a local tool that supports the required authentication instead.
Method 6: Check a WordPress Site with a Plugin
Broken Link Checker by WPMU DEV can scan WordPress content and missing images. It offers a cloud engine and a legacy local engine.
- Install and activate Broken Link Checker from the WordPress plugin directory.
- Choose the cloud or local mode.
- Run the first scan and open the report.
- Use Source URL to locate the post, page, comment, or field containing the link.
- Verify the failure before editing or unlinking it.
WPMU DEV's current plugin documentation says cloud scanning requires connecting the site to a WPMU DEV Hub account, but premium membership is not required. The local mode runs on your WordPress server, so monitor resource use on shared hosting or a content-heavy site.
For exact repair paths inside the CMS, use the WordPress broken link guide. If your site uses a different builder or hosted platform, follow the matching workflow:
- Find and fix broken links in Shopify
- Check broken links in Webflow
- Find and fix broken links in Wix
- Find and fix broken links in Squarespace
Those platforms differ mainly in where redirects, navigation links, product URLs, and published changes are managed. The HTTP diagnosis is the same, but the repair steps are not.
Method 7: Debug Loaded Resources with Chrome DevTools
Chrome DevTools is not a crawler. Its Network panel shows requests the current page actually made while DevTools was open. That makes it useful for broken images, scripts, stylesheets, fonts, document loads, and API calls.
- Open the page in Chrome.
- Open DevTools and select Network.
- Reload the page while the Network panel is recording.
- Filter by
status-code:404, another status code, or a resource type such as Img, JS, CSS, or Fetch/XHR. - Select a failed request to inspect its URL, initiator, headers, and response.
Chrome's official Network panel reference documents the status-code filter and the available resource-type filters.
The limitation is often misunderstood: a normal hyperlink is not requested just because it appears in the HTML. DevTools will not validate every <a href> on the page unless those destinations are actually requested. Use the browser extension for hyperlinks and DevTools for loaded resources. For missing image files specifically, follow the broken image troubleshooting guide.
How to Verify a Reported Broken Link
Never remove a useful link based on one crawler response.
- Open the destination in a normal browser.
- Retry it from another network or after a short delay when the error is
429, timeout, DNS, or5xx. - Check whether the crawler was blocked by
robots.txt, a firewall, CDN, or bot protection. - Confirm that the source page still contains the reported link. Crawl reports can become stale after an edit.
- Record the final status as confirmed broken, temporary failure, redirect, or false positive.
This step matters most for external links. A destination can return 403 to an SEO crawler and 200 to a visitor, or temporarily fail during the audit.
What to Do After You Find a Broken Link
Update the Source Link When a Direct Replacement Exists
Edit the page containing the link and point it directly to the current destination. This is the cleanest fix for internal links and external resources that moved to a known URL.
Restore or Redirect a Moved Internal Page
Restore a page deleted by mistake. If the content genuinely moved, create a 301 redirect to the closest equivalent page and update your own internal links to the final URL. Do not redirect unrelated missing pages to the homepage; that can create a soft 404.
Remove or Replace a Dead External Reference
Find a current primary source that supports the same statement. If none exists, rewrite the claim or remove the link. An archived copy can help identify what the old page contained, but it is not always the best destination for readers.
Plan Link Checks Before Large Site Changes
A redesign or migration can break navigation, templates, assets, canonicals, and old inbound URLs at once. Save a crawl before the release and compare it with a post-launch crawl. The website link audit before a redesign provides a complete pre-launch checklist.
Recheck the Source Page and Crawl Again
Verify changed pages immediately, then run a fresh crawl rather than relying on the previous report. For ongoing detection, set up automatic broken link monitoring at a frequency that matches how often the site changes.
Frequently Asked Questions
What is the fastest way to find broken links on one page?
Use a browser extension on the rendered page. It checks the links in context and is faster than configuring a full-site crawler for one URL.
What is the best way to find every broken internal link on a website?
Run a full crawl from the production homepage, include the XML sitemap as a discovery source, and export each failed destination with its inlinks. Add JavaScript rendering when the site depends on client-side navigation.
Does Google Search Console show all broken links?
No. It shows indexing and fetch issues for URLs Google knows about. It does not provide a complete inventory of outbound links from your content and cannot report URLs Google has not discovered.
Are all 404 pages bad for SEO?
No. A 404 is correct for content that no longer exists and has no replacement. The problem is a useful internal link, sitemap entry, or important backlink leading to that missing URL.
Should redirects appear in a broken link report?
They should appear as a separate review category, not as confirmed broken links. Update unnecessary internal redirects, investigate chains and loops, and leave intentional redirects in place when they serve a real migration or routing purpose.
Start with the narrowest method that answers your question. Check one page after an edit, crawl the whole site for an audit, use Search Console for Google's known errors, and bring in DevTools when the failure is a loaded resource rather than a hyperlink.

Pavel Molyanov
Creator of Broken Link Checker
Content marketer with 10+ years of experience. Founder of a content marketing agency. Writing about SEO, content workflows, and website maintenance.
Check Your Links in One Click
Broken Link Checker finds broken links and redirects on any page or across your whole website, and works in Google Docs and Sheets. Try 3 checks free, with no signup or card required.